
Marked blocks differ from the reviewed v1.08 manual. Edited: old text with a change; hover a block to see the old wording. New: not in the old manual.

Kink E-Stim Box K250-4S
User Manual: E-stim Box K250-4S
FIRMWARE 2.00.09 - 11/20261. Introduction
Welcome to the KINK E-STIM BOX K250-4S User Manual.
This manual is designed to guide you through the safe and effective use of your device. Please read all instructions and safety warnings before operating your KINK E-STIM BOX.
This manual describes firmware 2.00.09. The start screen shows the firmware version under the logo. If your box shows an older version, update it first (see Firmware Updates).
3. Safety Guide
KINK E-STIM BOX K250-4S Quick Safety Guide
- Talk to your doctor before use if you have skin, heart, nerve or any medical condition.
- The device is for healthy adults (18+) experienced with erotic e-stim.
- Take it slowly and be ready to turn down the power.
- Do not e-stim if you are pregnant or think you might be pregnant.
- Do not use if you have a pacemaker, defibrillator or any implanted metallic or electronic device
- Do not use on or near the head, neck or chest. Never allow currents to travel across your heart.
- Keep away from liquids. The Device is NOT waterproof.
- Do not use with another charged device or touch someone who is also using such a device.
- Never use the unit while plugged into wall power, due to the possibility of lightning/power surge.
General Safety Instructions
- Read all instructions before using the product.
- Only use the included USB Type-C charging cable when charging the device and when updating the firmware. Do not play with the device while it is connected to mains power.
- Keep the device away from water or moisture to avoid electric shock.
- Do not use the device if it appears damaged or if any parts are missing.
Battery Warning:
- Do not dispose of batteries in a fire.
- Batteries should be recycled or disposed of in accordance with local regulations. Visit www.call2recycle.org or contact your local recycling center for information on how to dispose of batteries.
Safe Handling Instructions:
- Handle with care.
- Wash your hands thoroughly after handling the device, especially before eating, drinking, or smoking.
- Avoid prolonged skin contact with the device during operation.
Children’s Product Warning: ⚠ WARNING: This product is not a toy. Keep out of reach of children.
CAUTION ⚠ : ANY CHANGE OR MODIFICATION TO THE DEVICE NOT EXPRESSLY AUTHORIZED BY RED SYSTEM VENTURES MAY VOID YOUR AUTHORITY TO OPERATE THE DEVICE.
Health and Medical Warnings:
- Consult your doctor before use if you have skin, heart, nerve, or any other medical condition(s).2
- The K250-4S is for healthy adults (18+) experienced with erotic e-stim.
- Take it slowly and be ready to turn down the power.
- Do not use it if you have a pacemaker, defibrillator, or any implanted metallic or electronic device.
- Do not use above the waist, and especially not near the heart, neck or head.
- Never allow currents to travel across your heart.
- Do not kiss while E-Stimming.
- Do not use with another charged device or touch someone who is also using such a device.
- Do not e-stim if you are pregnant or think you might be pregnant.
- Keep away from liquid. The K250-4S is NOT waterproof and poses a serious risk of electric shock.
- Never use the unit while plugged into wall power, due to the possibility of lightning/power surge. For external power, only use a USB-C battery pack that is not connected to a wall outlet.
Important Safety Notice: High-Power Device
This e-stim box is an advanced and powerful device designed for experienced users. Due to its high power output, it is crucial that you exercise the utmost care and caution during use. Improper use can lead to serious injury or damage.
- Start with the lowest power settings and gradually increase intensity as needed.
- Always monitor the device during operation to ensure safe and controlled usage.
- Know how to stop the output: tap the red stop button on the screen to stop all channels, or press and hold any knob for 2 seconds to turn the unit off.
- Do not exceed the recommended usage times to avoid potential harm. (Usage time varies by individual. Please make informed choices about usage time. We do not recommend overnight usage or using this device while sleeping)
- Ensure all connections are secure and in good condition before each use.
- Read and follow all instructions carefully before operating the device.
Warning: Failure to follow these safety guidelines may result in injury, damage to the device, or voiding of the warranty.
USB Power
While a USB cable is connected, and the External Power Warning is not accepted, the Activity Screen shows Please disconnect USB power to continue, no channel gives output, and the knobs do nothing. Disconnect the cable to continue.
The only allowed external power is a 5-Volt USB battery pack that is not connected to a wall outlet. To use one, open the Info screen, tap USB Power, read the External Power Warning, and agree and accept it. The box remembers this choice.
Power Specifications
External Power Input: 5V⎓2A
Battery Power Input: 3.65V⎓3.4A
- Non-Replaceable Battery: This device is equipped with a customized, non-replaceable battery that is designed to meet the specific power requirements of the unit. The battery includes an integrated protection circuit to ensure safe and reliable operation throughout the device's lifespan.3
California Proposition 65 Warning: ⚠ WARNING: This product contains chemicals known to the State of California to cause cancer, birth defects, or other reproductive harm.
2 Disclaimer: The K250-4S is not a medical device and should not be used as a substitute for professional medical advice or treatment. Consult a physician before using this product, especially if you have any underlying health conditions, such as heart disease, epilepsy, or skin conditions.
3 Disclaimer: The device contains a non-replaceable battery. Do not attempt to open, modify, or replace the battery. Doing so may cause a fire, explosion, or damage to the device.
4. Quick Start Guide
Quick Instructions
- Turning On: Press in ANY knob for 1 second to turn the unit on. The side LED will glow red to indicate a power-up.
- Turning Off: Press and hold ANY single knob for 2 seconds to turn the unit off.
- Turning Off Quickly: Press the 2 outer knobs simultaneously to immediately turn the unit off.
- Stopping All Output: Tap the red stop button at the top right of the Activity Screen. All channels stop and their power is set to 0.
- Reboot Reset: If you experience unresponsiveness while in operation, press the second button from the left for 15 seconds to reboot the box.
- Factory Reset: From a powered-down state, press and hold the two center knobs simultaneously for 4 seconds to begin the 50-second factory reset procedure. Upon completion, your unit will be reset to factory default settings. The firmware version is not reset during a factory reset.
- General Button/Knob Use: Each knob controls its own channel (left to right, #1-#4). Knobs can be pressed to move through the various on-screen menu items, as an alternative to the touch screen. Once the item you wish to adjust is indicated, you can make adjustments by turning the knob to scroll through menu choices or increase/decrease intensity.1
1 Disclaimer: The user assumes all responsibility for the use, misuse, or inability to use the K250-4S device. The manufacturer, distributors, and retailers are not liable for any injuries, damages, or losses resulting from the use of this product.
5. Device Overview
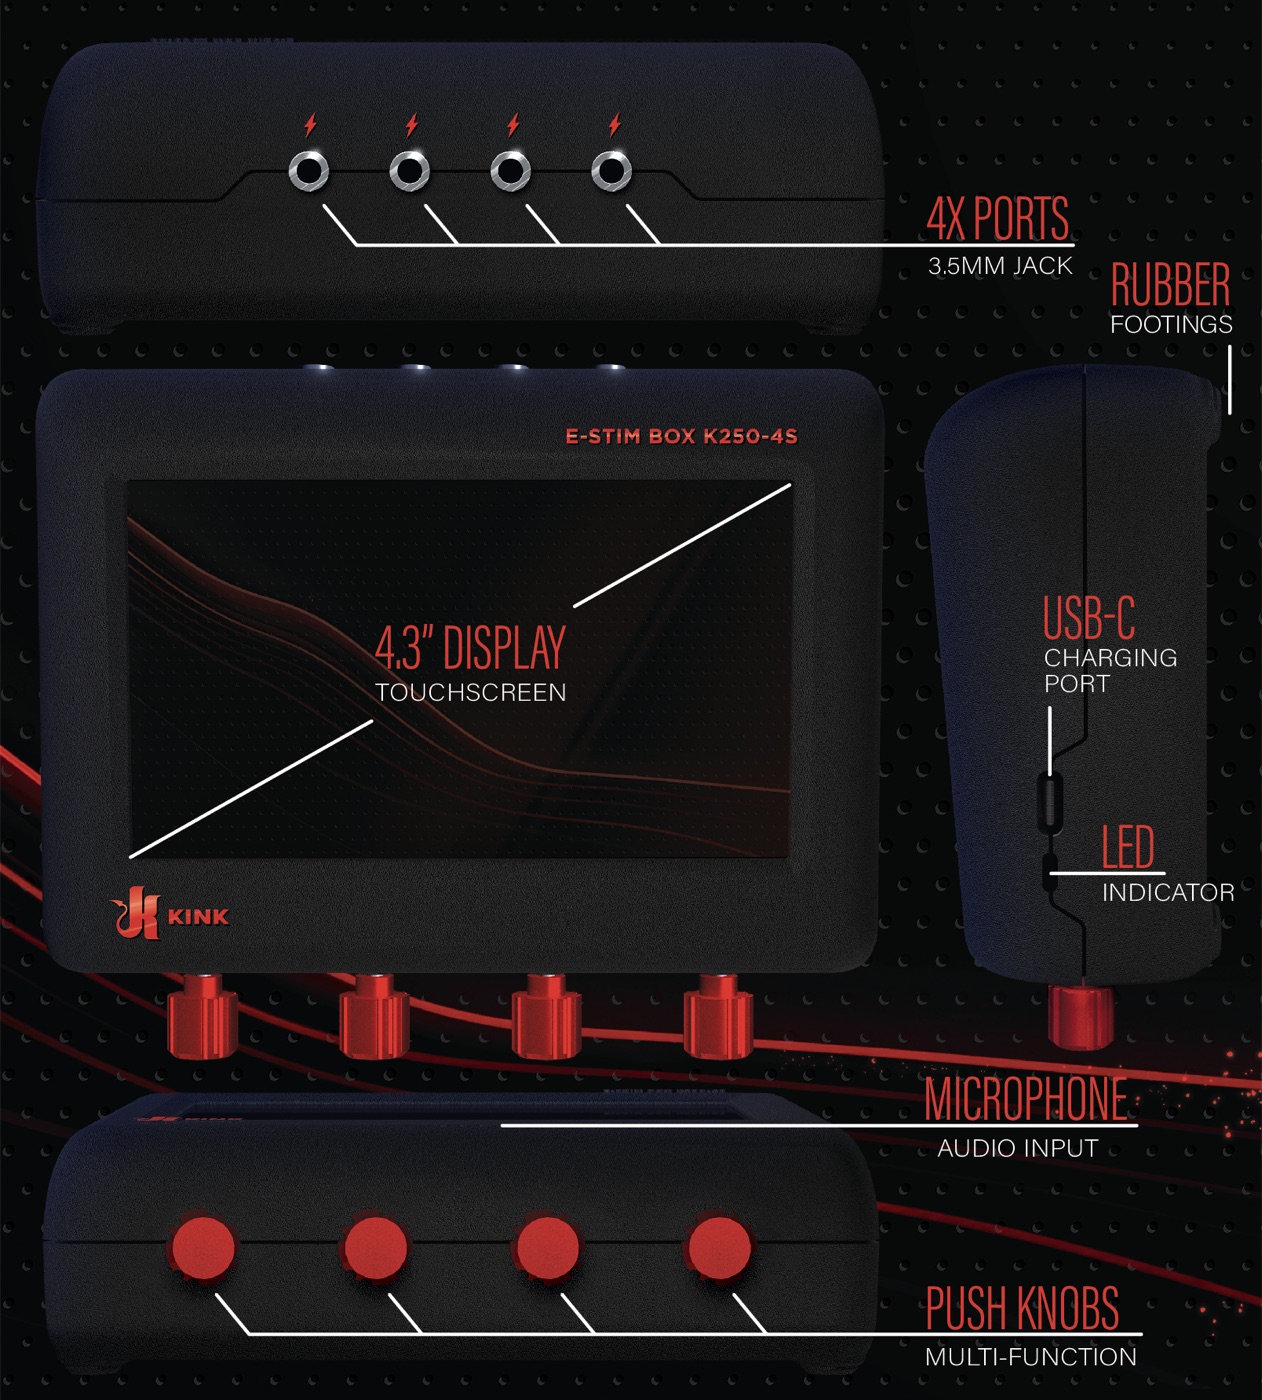
Front Panel Controls
- Power Button: Located on the left side of the device.
- Knobs: 4 adjustable knobs to control various parameters.
- LCD Touch Screen: Displays menus, options, and settings.
- Channels: 4 channels with individual control.
Operating Conditions
- Maximum Ambient Operating Temperature: 40º C / 104º F
Cable Attachment
1. Identifying the Cables:
- Channel Output Cables: These cables connect the K250-4S unit to your e-stim accessories.
- Power Cable: This cable connects the K250-4S to a power source for charging.
2. Attaching the Channel Output Cables:
- Locate the Channel Ports: The K250-4S has four channel ports located on the front of the device.
- Insert the Cables: Insert the output cables firmly into the channel ports.
3. Attaching the Power Cable:
- Connect the Power Cable: Insert the power cable into the power input port, located on the side of the device. Ensure that the plug is fully inserted and secure.
- Charging Indicator: When connected to power, the side LED will glow, indicating that the device is charging.
4. Verifying Connections:
- Disconnect From Mains Power Source: Do NOT operate the device while connected to mains power.
- Check for Firm Connections: Before using the device, ensure cables are secure.
- Power On: Once all cables are connected, press in any knob for 1 second to turn the device on and begin use.
5. Detaching the Cables:
- Power Off: Device is powered off by holding any knob for 2 seconds.
- Gently Remove: Carefully pull the cables out of the ports without twisting or bending them to avoid damage to the connectors.
Important Notes:
- Always attach the cables before turning on the device to prevent accidental activation.
- Do not force any cable into a port. If a cable doesn’t fit, double-check that you are using the correct port.
- Regularly inspect cables for any signs of wear or damage. Replace damaged cables immediately to avoid malfunction.
- Unplugging a cable, or moving a plug in its port, stops that channel's output at once. When you plug the cable back in, the channel starts again at power 0.
6. Interface Elements Overview
General Settings
- Gear Icon: Access the Settings Screen for the following:
- Power
- Power Level
- Update Firmware
- LCD Brightness
- Bluetooth
- Device Information
- Battery Indicator: Displays the current battery level and charging status.
- Stop Button (red, top right): Stops the output on all channels and sets every channel's power to 0. The output stays off until you turn a channel's power up again.
Control Elements
- Waveform/Mode Selection Dropdown Menu: Choose from various operating modes.
- Power Dial: Adjusts the output power.
- Multi Adjust Dial: Controls pulse frequency and width.
- Pulse Adjust Dial: Adjusts the pulse width, from −100% to +100%. 0% is the waveform's own pulse width. A minus sign changes the current direction (reverse polarity).
- Ramp Time Button (arrow above the Power dial): Sets how long the channel takes to reach a new power level, 0 to 5000 ms.
- Link Icons: Links channels for simultaneous control.
Special Indicators
- Power Level Indicator (bars on each channel tab): Shows the current that reaches your electrodes: green at low power, yellow at mid power, red near the maximum. It shows what reaches you, not what you set, so two channels at the same setting can read differently.
- Ramp Arc (teal, on the Power dial): Shows the power being delivered while a ramp runs.
Channel Controls
- Channel Selection Tabs: Located at the bottom of the interface:
- Allows you to select specific channels to adjust settings individually.
Linked Channel Adjustments
- Power Dial: On a linked channel, this becomes the "Link Power" dial.
- Multi Adjust Dial: Renamed to "Link Delay" on a linked channel.
7. Screen User Interface Walkthrough
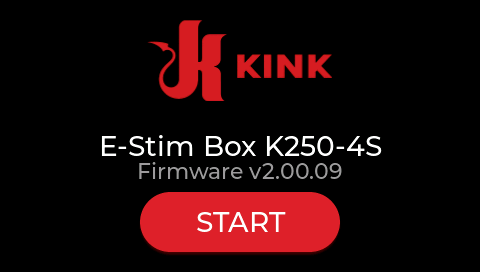
Start Screen
Tap the “Start” button to proceed.
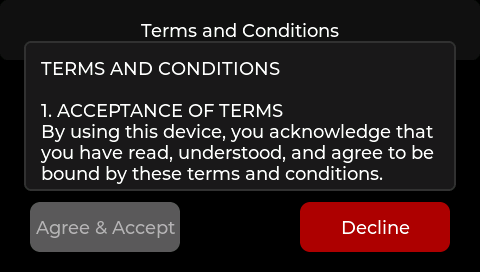
Terms Screen
Swipe up to review the entire content, then agree and accept to proceed. The terms must be accepted during the initial setup, or following a factory reset.

External Power Warning
Read this critical safety information carefully. Swipe up to review the full warning. You must agree and accept the terms to unlock and proceed.
Open it from the Info screen with the USB Power button. See USB Power.
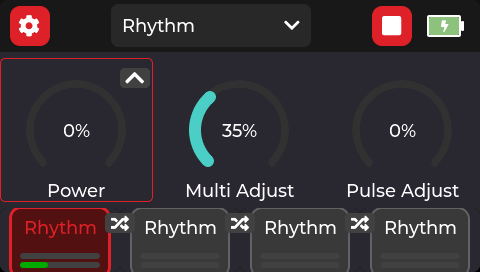
Activity Screen
This is the main screen for controlling up to 4x E-Stim outputs.

Waveforms
Press the dropdown to show the list of waveforms. Select the waveform of your choice.
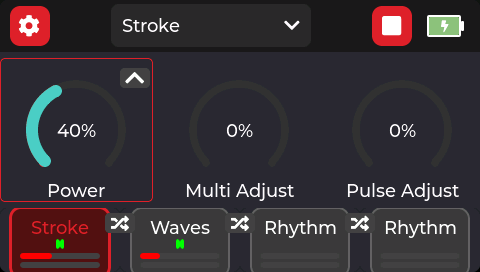
Activity Screen Operational
The four tabs at the bottom represent the channels. (Left to right #1-#4) The selected channel is outlined in red, and any adjustments made will only affect that channel (unless linked). A channel with nothing plugged in shows “No Plug”.
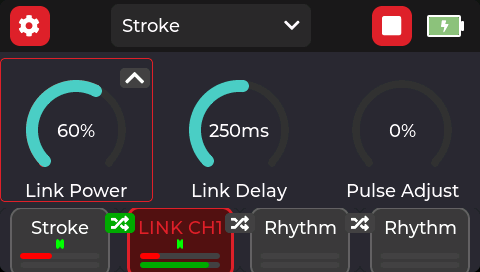
Activity Screen Linked
The link icons directly above / between the channel tabs will link any corresponding two to four channels together.
The Waveform is set on the left and links are added to the right. There are seven possible linking configurations:
(1-2-3-4) (1-2/3-4) (1/2-3-4) (1-2-3/4) (1/2-3/4) (1-2/3/4) (1/2/3-4)
Select the linked tab to control linked channels.
A link icon turns green when its channels are linked, and the linked tab shows the channel it follows, for example “LINK CH1”.
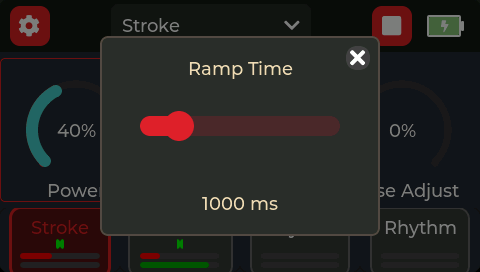
Ramp Time
Tap the arrow above the Power dial. Drag the slider to set how long the channel takes to reach a new power level. Tap the X to close.
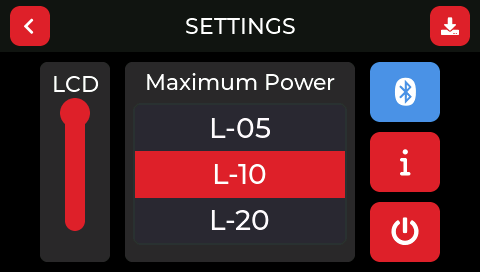
Settings Screen
From top left to bottom right: Back button, Install Firmware, LCD brightness slider, Power Level (Start at L-05 be extremely cautious as you move up), Bluetooth (Remote App Control), Info button, Power off.
Remote Control
Press the Bluetooth button when pairing with the Konnector.com App. You can control from the app in the same room or remotely. The App even has video built in for long distance sexyness.
Bluetooth is off each time the box starts, so turn it on each time you want to pair. The button is blue while Bluetooth is on.
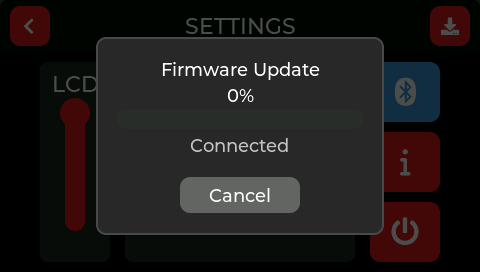
Firmware
Select the top right button with a down arrow to put the device in firmware update mode. Follow the steps here.
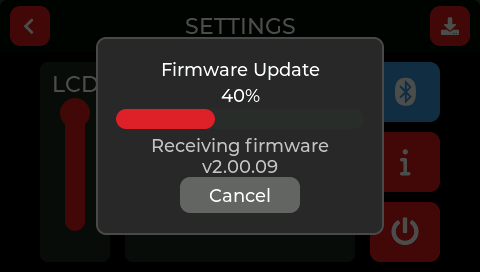
Firmware
Once the steps are taken to start the firmware process, this screen will display the progress. Do not exit the screen or turn off the device.
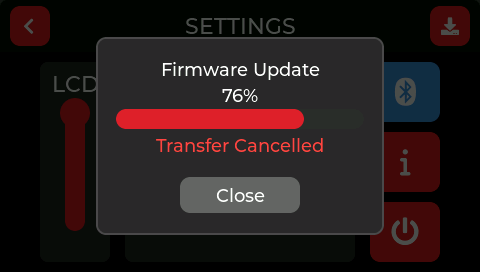
Firmware
If an error occurs during firmware update, you will get a similar warning. Simply restart the procedure.
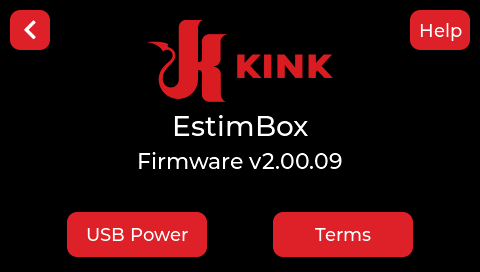
Info Screen
Tap the info button on the Settings Screen. Tap the version label to show the build, and tap it again to show the Device ID. The Help, USB Power and Terms buttons open the help text and the agreements.
8. Detailed Operation Instructions
Konnector App Navigation and Settings
- Navigation: Use the Konnector app interface to browse through on-screen menus seamlessly.
- Selection: Tap on menu items within the app to make selections.
- Adjustment: Adjust settings directly through the app's sliders and toggle controls for precise customization.
Waveform Descriptions and Tips
- Climb: Gradual increase in intensity. Start low and adjust as needed.
- Combo: A waveform that combines multiple sensations.
- Intense: Designed for those who enjoy higher intensity levels.
- Manual: A constant rhythmic pattern.
- Orgasm: Building waves of intensity for a climax effect.
- Rhythm: A rhythmic pulsating pattern.
- Sine: A smooth, continuous sine wave.
- Stroke: Mimics a stroking sensation, ideal for penile, vaginal, and anal stimulation.
- Torment: Randomized intensity for unpredictable sensations.
- Waves: A smooth, rolling waveform.4
Pulse Adjust
- The Pulse Adjust dial allows for precise fine-tuning of the delivered energy. This adjustment is separate from the Power setting and provides a distinctly different feel for a customized experience.
- Exercise Caution when beginning use of the Pulse Adjust dial because it can vary output parameters in surprising ways. We recommend slow, small adjustments with Pulse Adjust to gain familiarity with this feature.
Using the Knobs
- Press a knob to select its channel. Press it again to choose what the knob changes: Power, then Multi Adjust, then Pulse Adjust, then Waveform, then Power again. A yellow outline shows the active control.
- One click of the knob changes Power, Multi Adjust or Pulse Adjust by 1%.
- A knob does nothing for a channel with nothing plugged in.
Linked Channels
- A linked channel plays an exact copy of the channel on its left (its master), after the link delay.
- Link Power sets the linked channel's power as a share of the master's power, 0% to 100%. Turning the master down turns the whole group down, and setting the master to 0 stops the group.
- Link Delay sets how long after the master the copy plays, up to 3 seconds.
- A newly linked channel starts at Link Power 0%. Turn it up yourself.
- Unplugging a linked channel unlinks it. Links are not kept when the box turns off.
Power Limiter
- The box measures the current of each channel on every pulse and limits the output automatically. The limiter cannot be turned off.
- With some electrodes at high power, the output settles a little below the level you set (around 2%), and a power ramp can stop short of the level you set.
Power Level
- The Power Level on the Settings Screen (L-05 to L-100) sets the maximum power of all channels. The default is L-10. Start at L-05 and be extremely cautious as you move up.
- Changing the Power Level sets the power, Multi Adjust and Pulse Adjust of every channel to 0.
Auto Shutoff
- The box turns itself off after 15 minutes with no activity. Activity is a touch, a knob turn, plugging in or unplugging an electrode, or a Bluetooth command that changes the output or a setting.
- The box stays on while any channel has its power above 0, and while firmware update mode is on.
- After 3 minutes with no activity, the screen dims. Touch the screen or turn a knob to brighten it.
4 Disclaimer: Use of the K250-4S is at your own risk. The device is intended for adult use only and should be used in a safe and controlled manner. Misuse of the device can result in injury or damage to property.
9. Firmware Updates
Preparing Your Device
- Prepare for the Update:
- Confirm that the K250 Power Box battery is charged to at least 10% and that the device is plugged in.
- Visit the Update Site:
- Open a Chrome or Edge browser on your computer, or the Kinky Box Updater app on your phone.
- Navigate to www.kinkstore.com/estim/firmware.
- Important: Keep the webpage open and in focus during the entire process.
- Adjust your computer’s sleep settings to remain awake for at least 15 minutes or manually ensure the computer stays active.
- Put the Device into Firmware Update Mode
- From the device's main screen, click on the upper left button with the gear icon to enter the ‘Settings’ screen.
- From the device Settings screen, click on the upper right button with the down arrow, the "Download to Device" button, to activate Firmware Update Mode. Once activated, the device screen should indicate that it is in Firmware Update Mode and show Awaiting connection...
Install Your New Firmware
- In the updater, select your box from the list, then choose Update firmware.
- Choose the firmware and start the update. The box shows Connected, then Receiving firmware with the version number and the progress.
- Keep the Browser in the Foreground and In Focus! Ensure the browser window remains active and in focus throughout the update process.
- Completion: The system will notify you once the update is complete. The box turns off and starts again with the new firmware.
To stop an update, tap Cancel on the box. If the transfer has started, tap Confirm to stop it.
Important Notes on Firmware Updates
- No Factory Reset After Firmware Update: A firmware update normally keeps your settings. A factory reset is not required after an update. If an update resets the settings, accept the terms again.
How to Perform a Factory Reset
- Start from a powered-down state.
- Press and hold the two center knobs simultaneously for 4 seconds to initiate the factory reset.
- Wait. The reset procedure will take 50 seconds to complete.
- Once finished, your unit will be restored to factory default settings. You will have to reaccept the terms.
- Note: The firmware version is not affected by the factory reset.
- A factory reset also erases the error log.
10. Troubleshooting
Device Won’t Power On
- Depress any knob for a full 2 seconds to activate the device
- Check Battery: Ensure the device is charged.
- Does the indicator light come on when the USB-C cable is connected?
- If so, give the battery time to charge.
- Try a Reboot: Press the second button from the left for 15 seconds to reboot the box.
- Try a factory reset by pressing the two center buttons simultaneously for 4 secs.
- Inspect Connections: Verify all cables are properly connected.5
Channel Isn’t Working
- Check that the channel's power is above 0. The stop button, unplugging a cable and changing the Power Level all set the power to 0.
- If the screen shows Please disconnect USB power to continue, disconnect the USB cable.
- If the channel is linked, check the power of its master channel and the Link Power, or unlink it.
- Try a factory reset by pressing the two center buttons simultaneously for 4 secs.
Channel Tab Doesn’t Respond to a Tap
- Tap the upper part of the tab. The lower part, where the power bars are, does not respond in this firmware.
Trouble Connecting to device for Firmware Updates
- Try putting your browser into “incognito” mode
- Make sure the box shows the Firmware Update screen, and use Chrome or Edge. Safari and Firefox cannot connect to the box.
5 Disclaimer: The manufacturer does not guarantee the device's performance in all scenarios. Follow the instructions carefully and consult support if issues persist.
11. Error Log
The box keeps an error log that stays when the box turns off. It records each start, why the box turned off (for example a low battery or the auto shutoff), and any fault the firmware finds. After a firmware update, or when the last start had a problem, the Start Screen shows a red line of text at the top.
- To see the log: Settings Screen → Info → press and hold Help → tap > at the top right.
- To send the log with a problem report: the Kinky Box Updater can read the log from the box over Bluetooth.
- Device ID: on the Info screen, tap the version label twice. Include it when you contact support.
12. Firmware Change Logs
Change Log for v2.00.09 (from v2.00.08b)
- Auto shutoff now works: the box turns off after 15 minutes with no activity.
- New red stop button on the Activity Screen.
- No output while the box asks you to disconnect USB power.
- The Firmware Update screen shows “Connected” while the app is connected, and closing it always ends the connection.
Change Log for v2.00.08b (from v2.00.07b)
- Error log that stays after a restart, readable on the box and over Bluetooth.
- Device ID on the Info screen.
- The Firmware Update screen shows the exact version being received.
- Channels no longer stay off after the terms are accepted.
- The screen dim follows the brightness you set.
Change Log for v2.00.07b (from v2.00.06b)
- Link delay up to 3 seconds; a linked channel is an exact delayed copy of its master.
- Links are no longer kept after the box turns off.
- Faster, more precise pulse timing, and more reliable firmware updates.
- Charging and battery temperature fixes.
Change Log for v2.00.06b (from v1.08)
- New screens and controls: three dials per channel, a power level indicator and a ramp time control.
- New pattern engine. “Test” is renamed “Manual”, and the Sine waveform is added.
- A linked channel's power is now a share of its master's power.
- Automatic power limiter on every channel.
- Output stops at once when a plug moves.
- Bluetooth is off at each start. Firmware updates have a Cancel button.
Change Log for v1.08 (from 1.02)
- Improved Pattern Stability:
- Fixed initial small bursts on all patterns.
- Resolved the Stroke pattern issue that caused high energy output when Multi Adjust was manipulated.
- Enhanced Safety Features:
- Added extra safety measures on the supervisor level (overlay controller) to ensure power output remains within individual channel settings. Even if a pattern requests extreme power, it will be capped at the channel's maximum power setting (adjusted from system max power).
- Refined User Interface:
- Updated "SO" label to "FA" (Fine Adjust) to clarify its function. The FA slider adjusts pulse width for a smoother experience.
- Slide Up: Original pattern pulse widths.
- Slide Down: Reduces pulse width to 50% of the original, allowing finer control over energy output.
- Updated "SO" label to "FA" (Fine Adjust) to clarify its function. The FA slider adjusts pulse width for a smoother experience.
- Bug Fixes:
- Fixed "Maximum Power" display bug after factory reset.
- Updated the factory reset screen to display "--- FACTORY RESET --- in progress...".
- Resolved the LCD brightness scale issue when using the knobs.
- Linked Channels Improvements:
- Adjusted Power Multiplier settings for linked channels now range from 10% to 200% of the source channel's power.
- Disabled the "Link Delay (sec)" slider as it is non-functional. The slider is now grayed out and touch control is disabled.
13. Known Bugs
Firmware v2.00.09
- The lower part of a channel tab, where the power bars are, does not respond to a tap. Tap the upper part.
- The factory reset can sometimes leave the box dark. Press the second button from the left for 15 seconds to reboot the box.
- When a channel starts, its output can be slightly above the level it settles at for about 5 seconds.
- The last waveform used is not saved. Each time the box starts, every channel uses the default waveform.
14. Legal and Compliance Information
CERTIFICATE OF CONFORMITY
US Regulatory Wireless Notice
This device complies with Part 15 of the FCC Rules. Operation is subject to the following two conditions: (1) this device may not cause harmful interference, and (2) this device must accept any interference received, including interference that may cause undesired operation.
The FCC requires the user to be notified that any changes or modifications made to the device that are not expressly approved by E-Stim Systems Ltd may void the user's authority to operate the equipment.
European Union Notice
Products bearing the CE marking comply with the R&TTE Directive (1995/5/EC), EMC Directive (89/336/EEC), and the Low Voltage Directive (73/23/EEC) issued by the Commission of the European Community.
Compliance with these directives implies conformity to the following European norms (in parentheses are the equivalent international standards and regulations)
EN 55022 (CISPR 22) – Electromagnetic Interference
EN 55024 (IEC61000-4-2,3,4,5,6,8,11) – Electromagnetic Immunity
EN 60950 (IEC 60950) – Product Safety.
This device may be used in all European Union Countries.
Sold as an adult novelty device only. Not to be used by children.
Actual Certificate link: here
FCC and Regulatory Compliance
The product meets Class A/B digital device standards under FCC Section 15.105.
ISED (Canada) Compliance
This product also meets the Canadian regulatory standards as outlined in RSS-GEN 4.3 for devices with certified modules. Compliance information for the ISED standard is included with this user manual and on the product label.
For Part 15 Compliance: This device complies with Part 15 of the FCC Rules. Operation is subject to the following two conditions:
- This device may not cause harmful interference.
- This device must accept any interference received, including interference that may cause undesired operation.
FCC ID: SH6MDBT50
Interference Notice: This equipment generates, uses, and can radiate radio frequency energy. If not installed and used correctly, it may cause harmful interference to radio communications. If interference occurs, users are encouraged to:
- Reorient or relocate the receiving antenna.
- Increase the separation between the device and the receiver.
- Connect the device to an outlet on a different circuit from the receiver.
Modifications Warning
Any changes or modifications to this device not expressly approved by the manufacturer may void the user’s authority to operate the equipment under FCC rules.
RF Exposure Information (if applicable)
To ensure compliance with FCC RF exposure guidelines, users must follow all provided instructions for safe usage. This includes maintaining a proper distance between the device and any individuals during operation.
Interference Instructions
If this device causes interference to radio or television reception, or is receiving interference from another source, users can take the following steps to resolve the issue:
- Reorient or relocate the receiving antenna.
- Increase the separation between the device and the receiver.
- Connect the device into an outlet on a circuit different from that to which the receiver is connected.
California RoHS Compliance: This product is RoHS compliant and meets California's requirements for the restriction of hazardous substances.
Electronic Waste (E-Waste) Recycling Information: This device should not be disposed of with regular household waste. Please recycle it at designated electronic waste collection points. For more information on electronic waste recycling, visit www.calrecycle.ca.gov/Electronics or contact your local waste management authority.
California Energy Commission (CEC) Compliance: This product complies with California Energy Commission (CEC) regulations for energy efficiency.
Lead-Free Statement: This product is lead-free and meets all applicable standards for lead content in California.
Prop 65 Warning: This product may contain chemicals known to the State of California to cause cancer, birth defects, or other reproductive harm.6
Indemnity and Liability
The User accepts full responsibility for any loss, damage, or injury to themselves, others, or property arising from the use, misuse, or inability to use the K250-4S. Red System Ventures LLC and its affiliates shall not be liable for any damages, including direct, indirect, incidental, or consequential damages.
Binding Arbitration
Any dispute arising from the use of the K250-4S shall be resolved through binding arbitration. The User waives the right to initiate a lawsuit, except for enforcing an arbitration decision.
6 Disclaimer: The user is responsible for ensuring that the use of the K250-4S complies with all local, state, and federal laws. The manufacturer is not responsible for any legal consequences arising from the improper or unlawful use of this device.
15. Warranty Information
The K250-4S comes with a 1-year limited warranty covering defects in materials and workmanship. This warranty does not cover damage caused by misuse, abuse, or unauthorized modifications.7
To Claim Warranty:
- Contact Customer Support at [email protected].
- Provide proof of purchase and a detailed description of the issue.
- Ship the device to the provided address for inspection.
7 Disclaimer: The warranty is non-transferable and only applies to the original purchaser.
16. Contact Information
If you have any questions about this product's safety, please contact our customer service at [email protected].
Email: [email protected]
Address: 1750 Folsom St, San Francisco, CA 94103

Over $119

Discreet

Support

Free Returns

100,000+ Kinky Customers
500+ 5 Star Reviews